Getting Started
Getting Started
You just bought the plugin (or you’re about to). The next 10 minutes get you from “downloaded zip” to “the AI is building Blueprints for me.” Here’s the whole journey.
We’ll go through it in order:
- Install the plugin in your engine
- Activate your license
- Open the plugin window
- Send your first AI prompt
If you get stuck at any step, jump to Troubleshooting at the bottom.
Before you start — what you need
| Thing | Why |
|---|---|
| Unreal Engine 5.4, 5.5, 5.6, or 5.7 | The plugin runs inside the editor |
| Windows, macOS, or Linux | All three work |
| A FAB Marketplace order ID or a license key from our website | Activates the plugin on your machine |
That’s the whole list. You don’t need an API key, you don’t need to install Python or anything else. The plugin ships with a small built-in AI allowance — you can try it the moment activation finishes.
Step 1 — Install the plugin
You bought the plugin on FAB Marketplace. Now we install it in your engine.
- Open the Epic Games Launcher.
- Go to your Library.
- Find the plugin in your purchases and click Install to Engine.
- Pick the engine version you want to install it on (5.4, 5.5, 5.6, or 5.7). You can install to more than one — pick whichever you’ll use.
- Wait for the install to finish. Usually 1–2 minutes.
Now open your Unreal Engine project:
- Go to Edit → Plugins in the top menu.
- Search for “Ultimate Engine Co-Pilot”.
- Tick the checkbox to enable it.
- The editor will ask you to restart. Click Restart Now.
When the editor comes back, the plugin is installed but not yet activated. Next step.
Step 2 — Activate your license
The first time the editor reopens with the plugin enabled, an activation window pops up. There are two ways in — pick whichever matches how you bought.
If you bought on FAB Marketplace
- Click the FAB Marketplace tab.
- Type the email address you used on FAB.
- Type your FAB Order ID. It starts with
Afollowed by 16 digits, likeA1234567890123456. You can find it in the email FAB sent you when you purchased. - Click Submit Order.
- Wait. Verification usually finishes in under 5 minutes — the plugin checks automatically. The window updates when you’re activated.
If you bought on our website
- Click the Website Purchase tab.
- Type your license key. It looks like
XXXXX-XXXXX-XXXXX-XXXXX. - Click Activate License.
Either way, once activation succeeds, the plugin is tied to your machine. You only do this once. Activation carries across every project on this computer and survives editor restarts.
Step 3 — Open the plugin
Open the plugin window from:
- Window menu → Ultimate Engine Co-Pilot, or
- The plugin icon in the top toolbar
The window opens with four main tabs along the top-left:
| Tab | What it’s for |
|---|---|
| Blueprint Architect | The main chat. You type what you want, the AI builds it. |
| Project Scanner | Index your whole project so the AI can answer questions about anything in it. |
| Tools | Quick access to plugin utilities — image generation, mesh generation, sound generation, and more. |
| Learn | Built-in courses, tutorials, and a skill tree to guide you through the plugin. |
You’ll also see a gear icon in the top-right and a Settings button in the bottom-left — both open the same Settings panel. That’s where you configure AI providers, themes, voice, and everything else.
The bottom-left strip also has shortcuts to Instructions, GDD, and AI Memory — features you’ll meet later. For your first prompt, click Blueprint Architect.
Step 4 — Try your first prompt
You’re in the chat. In the message box at the bottom, type:
Create a third person character with movement and a health systemPress Enter (or click Send).
You’ll see the AI work in real time:
- A message bubble appears with the AI’s plan
- Tool calls scroll past as the AI creates the Blueprint, adds components, sets up variables, and wires the logic
- When it’s done, you have a working Blueprint in your project
That’s it. You’re up and running.
If you want something more specific, try one of these:
Make me a UI widget with a health bar that fills based on a player variableCreate a Niagara system that emits sparks when an actor takes damageBuild a save system that stores player position and inventoryThe AI handles all of it.
The built-in starter tier
The plugin ships with a small built-in starter allowance so you can try it straight away — no signup, no API key, no payment.
It’s a starter tier: enough to see the plugin work. When it runs low, you either wait for it to reset or set up your own AI provider (OpenAI, Claude, Gemini, DeepSeek, a local model, and more — see AI Providers). That’s the path for real, unlimited use.
Provider slots and the ALT+1 to ALT+9 hotkey
The plugin gives you 9 provider slots, switchable with Left ALT + 1 through Left ALT + 9. Each slot is independently configurable — you can set one slot to the starter tier, another to use your Claude API key, another to run a local LLM, another to drive a CLI agent like Claude Code, and so on.
Hit ALT+3 at any point and the active slot switches to slot 3. A small toast pops up confirming the switch (e.g. “Switched to: Claude API”). The change applies to the next message you send — any reply the AI is currently generating finishes through the old slot, and your next prompt goes out through the new one. This lets you swap between cheap-and-fast and powerful-and-expensive in a single keystroke without breaking your conversation flow.
Supported engines and platforms
| Engine version | Status |
|---|---|
| Unreal Engine 5.4 | Supported |
| Unreal Engine 5.5 | Supported |
| Unreal Engine 5.6 | Supported |
| Unreal Engine 5.7 | Supported |
| Platform | Status |
|---|---|
| Windows | Supported |
| macOS | Supported |
| Linux | Supported |
The plugin is editor-only — it helps you build games but doesn’t get included in the games you ship. Your players never need it.
Updating the plugin
There are two kinds of update.
New plugin versions
When we ship a new version with bug fixes or new features:
- Open the Epic Games Launcher.
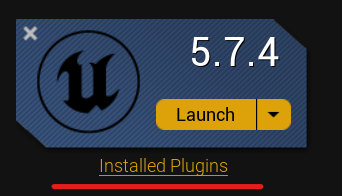
- Go to Library → click Installed Plugins under your engine version.
- If an update is available you’ll see an Update button next to the plugin.
- Click Update and wait for it to install.
- Restart the Unreal Editor.
Cloud content updates
Some things update automatically in the background — AI prompt files, tool documentation, model lists. You don’t need to reinstall anything to get these. They sync the next time you start the editor with the plugin loaded.
You can see your current plugin version (and the cloud-update status) in Settings → Updates.
Removing or reinstalling the plugin
If something’s gone wrong and you want a clean slate:
Step 1 — Remove from the engine
- Open the Epic Games Launcher.
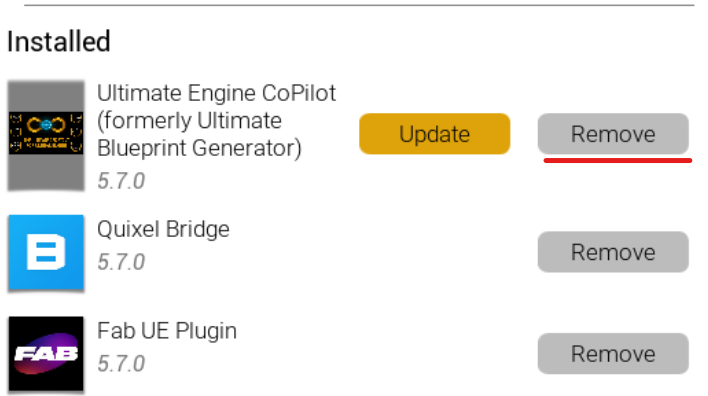
- Go to Library → Installed Plugins.
- Find the plugin and click Remove.
Step 2 — Delete leftover files (Windows path shown)
After removal, check that there’s nothing left over. Open File Explorer and go to:
C:\Program Files\Epic Games\UE_5.X\Engine\Plugins\Marketplace\UltimateBlueprintGeneratorReplace 5.X with your engine version. If the folder is still there, delete it.
Heads up about the folder name: the plugin’s user-facing brand is Ultimate Engine Co-Pilot, but on disk the folder keeps an older name (UltimateBlueprintGenerator). That’s intentional — renaming would lose your saved settings.
Step 3 — Reinstall
Go back to your FAB Library, find the plugin, click Install to Engine, and pick your engine version. You’ll get a fresh copy.
Your activation still applies — you don’t have to enter your license key or order ID again.
Troubleshooting
The activation window doesn’t appear. The plugin only shows the activation window on first launch after enabling. Open the plugin window manually (Window → Ultimate Engine Co-Pilot) — the activation will appear in the Settings panel under License.
Verification is taking longer than 5 minutes. FAB occasionally has a delay. You can keep the activation window open — it checks automatically every 30 seconds. If 30 minutes pass with no result, double-check the order ID and email you entered exactly match what’s on your FAB receipt.
The plugin doesn’t appear in the Plugins menu. Make sure you installed it into the right engine version. You can install to multiple versions — each install is separate. Restart the editor after enabling.
The starter tier shows “rate limited” right away. You may have used your starter allowance in another project. It resets on a schedule shown in the plugin’s status area. While you wait, plug in your own AI provider in Settings → AI Models — see AI Providers.
If you hit something not on this list, the FAQ covers more edge cases. Still stuck? Reach us on Discord.
What’s next
Now that you’re up and running, the most useful next reads:
- Blueprint Architect — the AI chat in detail, including the four interaction modes (just chat, ask before edit, plan, auto edit)
- AI Providers — how to use your own OpenAI / Claude / Gemini key for unlimited usage
- Project Scanner — index your whole project so the AI can reason about anything in it
Welcome aboard.